DEC the 100" Hybrid
-
TrickyS2010

- Posts: 58
- Joined: Sun Jan 07, 2007 5:10 am
- Location: Bradford
- Full Name: Richard Spencer
- Contact:
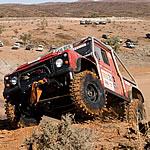
DEC the 100" Hybrid
This is the 100" Hybrid "DEC" I built ( with a lot of help from father )

It was originally:-

Clicking on the link below will take you to the build gallery
http://www.doric4x4.co.uk/mymotors/decsbuild/progal.htm
It was originally:-
Clicking on the link below will take you to the build gallery
http://www.doric4x4.co.uk/mymotors/decsbuild/progal.htm

-
TrickyS2010
- Posts: 58
- Joined: Sun Jan 07, 2007 5:10 am
- Location: Bradford
- Full Name: Richard Spencer
- Contact:


-
davew
- Chairman
- Posts: 2242
- Joined: Fri Jan 05, 2007 8:54 pm
- Location: Knaresborough
- Full Name: Dave White
How do you/he go about shortening the roof panel ?
First time I did mine I took it apart at the join in the middle and shortened the back, then riveted it back together again. This looked good apart from the gutters that gave me some grief.
Just did another one, mindful of the gutter problem, I took the back panel out, shortened the top panels and tried to re-fold the top panel over the back... didn't work very well although the gutters are now a lot better.
-
TrickyS2010
- Posts: 58
- Joined: Sun Jan 07, 2007 5:10 am
- Location: Bradford
- Full Name: Richard Spencer
- Contact:
To shorten the roof :-
Put the roof on the vehicle and make sure the window at the front is in the correct location.

This will give you some idea of where to cut.
Take out the back panel. You need to decide at this point if you wish to make the cut straight on the guttering or at 45 degrees.
Remove the strengtheners from the top of the roof using an angle grinder. These need to be overlapped when it’s put back together.
Shorten the roof by cutting straight round the corners and across the centre section.
Clamp the back panel back to the chopped roof and fold over the middle section. This can then be riveted to give it some strength.
The corners of the gutter can be welded back together.
This leaves the curved corners to be V cut and folded one by one. It usually takes a bit of cutting and filing to get it right. Once they are folded they can be blind riveted back to the roof.

Put the roof on the vehicle and make sure the window at the front is in the correct location.
This will give you some idea of where to cut.
Take out the back panel. You need to decide at this point if you wish to make the cut straight on the guttering or at 45 degrees.
Remove the strengtheners from the top of the roof using an angle grinder. These need to be overlapped when it’s put back together.
Shorten the roof by cutting straight round the corners and across the centre section.
Clamp the back panel back to the chopped roof and fold over the middle section. This can then be riveted to give it some strength.
The corners of the gutter can be welded back together.
This leaves the curved corners to be V cut and folded one by one. It usually takes a bit of cutting and filing to get it right. Once they are folded they can be blind riveted back to the roof.
-
davew
- Chairman
- Posts: 2242
- Joined: Fri Jan 05, 2007 8:54 pm
- Location: Knaresborough
- Full Name: Dave White
Pretty much the way I did it the last time, tried to use a steel jig instead of cutting slots in the curved section of the fold... which is where it all went a bit pear shaped  The fold is OK but no amount of persuasion with a shrinking hammer would get rid of the excess. Might bend it back out a bit and slot it like you've done.
I went for a 45 degree cut on the gutters which worked a treat.
I went for a 45 degree cut on the gutters which worked a treat.
-
Orange rover
- Posts: 107
- Joined: Sat Jan 06, 2007 4:09 pm
- Location: Doncaster
- Full Name: Martin Ellis
-
TrickyS2010
- Posts: 58
- Joined: Sun Jan 07, 2007 5:10 am
- Location: Bradford
- Full Name: Richard Spencer
- Contact:


-
TrickyS2010
- Posts: 58
- Joined: Sun Jan 07, 2007 5:10 am
- Location: Bradford
- Full Name: Richard Spencer
- Contact:


-
TrickyS2010
- Posts: 58
- Joined: Sun Jan 07, 2007 5:10 am
- Location: Bradford
- Full Name: Richard Spencer
- Contact:

-
Orange rover
- Posts: 107
- Joined: Sat Jan 06, 2007 4:09 pm
- Location: Doncaster
- Full Name: Martin Ellis
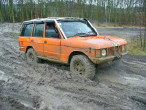
Nice orange and snow, it could have been worse it could have been yellow snow 
Another crappy day in paradise
WWW.OCUREM.COM
WWW.OCUREM.COM
Who is online
Users browsing this forum: No registered users and 15 guests