Rebuilding Pam's 90
-
davew

- Chairman
- Posts: 2242
- Joined: Fri Jan 05, 2007 8:54 pm
- Location: Knaresborough
- Full Name: Dave White
Too late, spent this evening outside cutting the connector off and splicing it into the chassis loom. Turned out to be a bigger job than expected (imagine my surprise !) because not all the wires on the other two chassis harness connectors matched the ones on the bulkhead harness.
I ended up having to meter out most of the harness to check out what was connected to where and move some of the wires form one connector to another.
Still, it all seems to work now so it's all good
I ended up having to meter out most of the harness to check out what was connected to where and move some of the wires form one connector to another.
Still, it all seems to work now so it's all good
-
davew
- Chairman
- Posts: 2242
- Joined: Fri Jan 05, 2007 8:54 pm
- Location: Knaresborough
- Full Name: Dave White
A belated update from Saturday night, Sunday I was allowed a day off and spent most of the morning in bed, the afternoon with the outlaws and the evening trying to figure out exactly what the tax man means by profit/loss account and why the Webdesigna accounts didn't add up to the same as said profit/loss account !
Anyway, I did get out on Saturday and got some more work done. I started off by fitting the handbrake lever to the seatbox. This wasn't as straight forward as you'd think (when is it ever !) because we bought a brand new seatbox to replace the rotted one originally fitted. This brand new one doesn't have the holes for a handbrake, presumably so it can be fitted to either LHD or RHD vehicles.
I dug the old seatbox out from behind the shed and made a template from the holes in that and then tried my best to match them on the new seatbox. It took a couple of hours of careful measuring but I got there in the end and even the warning light on the dashboard works.
I've had to purchase a replacement transmission brake assembly for the back of the transfer box as the old one doesn't fit the new transfer box. Matthew had a Disco one and I soon had that fitted after figuring out how to remove the cable from it as the Defender uses a different cable. It all bolted on OK and while I was under there I fitted the speedo transducer and wired that up (after testing the transducer worked first with my cordless drill which, as a point of interest, does about 20MPH flat out according to the speedo !)
I made and fitted the temperature gauge adaptor that should match the engine sender unit to the dashboard gauge... in theory ! This was just a case of fitting a small 100 ohm variable resistor to a piece of veroboard with a couple of wires coming out. following my kitchen experiments I set it to just short of 30 ohms.
I bolted the seatbox to the backbody using a strip of butyl to seal it up. have to say I'm impressed with that stuff, a bit like sikaflex but without the mess:
http://www.cbsonline.co.uk/butyl-sealer ... 1564-p.asp
i'll probably use it for the front wing skins too. I also fixed the bulkhead closing panel thing ready to take the tunnel cover, again using butyl strip to seal it (hopefully it won't have to come off again anytime soon !). The hex head screws that Matthew got from Wurth for me are spot on for this job.
I fitted the diff lock linkages, again this had to be modified slightly to make it work as the gearbox mount is slightly different to a manual version but it was just a case of reconfiguring what I had rather than fabricating anything. Wired up the diff lock warning light - which now works.
I had a good look at the oil leak/stream that the engine has been filling my oil drain can with. I'd originally thought it would be the rear crank oil seal (which is a gearbox out job) but having taken a closer look I think it's just the sump gasket that's failed, probably as a result of the engine being sat on it's sump when it was on the ground. It's a job that needs doing but a lot less hassle than a crank oil seal would have been.
This coming weekend I want to trial fit the doors so I can get the bulkhead and backbody aligned then they can be tightened up and the wings can go on. I'll try and get the wings built up in the evenings as it's a job that can be done in the sitting room.
-
davew
- Chairman
- Posts: 2242
- Joined: Fri Jan 05, 2007 8:54 pm
- Location: Knaresborough
- Full Name: Dave White
Got a few jobs done last night and today in preparation for starting to put the bodywork on.
The Land Rover alarm ECU finally arrived and Pam dropped in at Maddison4x4 with it on Friday on her way home from work and got the key fobs paired up to it, she also picked the new handbrake cable.
Friday evening I fitted the handbrake cable and the alarm ECU, both working perfectly. I also made up the captive nuts/plates for the rear cross member and the rear tub seat belt bracing bars so the rear tub was fully bolted on.
Saturday morning was spent finishing off a few odd jobs - replacing two of the front radius arm bolts, fitting the front axle breather pipe, putting a new lock washer on the steering drop arm. I also took the windscreen hinges/gaskets off and replaced them after sealing them with dinitrol to try and keep the water out.
The afternoon/early evening was then devoted to hanging the front doors (they are still bare) on their hinges so I could adjust and tighten the bulkhead and the rear tub mounts. The drivers side wasn't too bad, the biggest adjustment being that the front of the tub needed lifting about 1/2 an inch.
The passenger side proved to be a bit more of a challenge, it seemed that raising the front of the tub on the drivers side had also raised it on the passengers side and that was spot on but by the time I'd got the bulkhead squared up with it the gap to the rear of the door was about 1/2 inch too wide. This meant I had to move some spacer washers around to move the bulkhead backwards to close up the gap.
By the time I'd finished and got everything tightened up it all looked pretty good by torchlight. I decided to leave the doors on for tonight and, if it still looks good in the daylight I'll put the front wings on tomorrow then the doors can come off again ready for assembling them. I'll see if I can get some pics tomorrow but it's not easy in such a confined space.
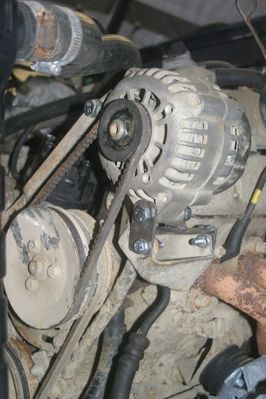
To break up the wall of text a bit, this is the fabricated alternator mount...
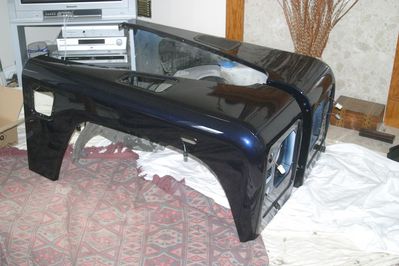
Here are the wings with the outer skins and inner wings attached and ready for fitting...
The Land Rover alarm ECU finally arrived and Pam dropped in at Maddison4x4 with it on Friday on her way home from work and got the key fobs paired up to it, she also picked the new handbrake cable.
Friday evening I fitted the handbrake cable and the alarm ECU, both working perfectly. I also made up the captive nuts/plates for the rear cross member and the rear tub seat belt bracing bars so the rear tub was fully bolted on.
Saturday morning was spent finishing off a few odd jobs - replacing two of the front radius arm bolts, fitting the front axle breather pipe, putting a new lock washer on the steering drop arm. I also took the windscreen hinges/gaskets off and replaced them after sealing them with dinitrol to try and keep the water out.
The afternoon/early evening was then devoted to hanging the front doors (they are still bare) on their hinges so I could adjust and tighten the bulkhead and the rear tub mounts. The drivers side wasn't too bad, the biggest adjustment being that the front of the tub needed lifting about 1/2 an inch.
The passenger side proved to be a bit more of a challenge, it seemed that raising the front of the tub on the drivers side had also raised it on the passengers side and that was spot on but by the time I'd got the bulkhead squared up with it the gap to the rear of the door was about 1/2 inch too wide. This meant I had to move some spacer washers around to move the bulkhead backwards to close up the gap.
By the time I'd finished and got everything tightened up it all looked pretty good by torchlight. I decided to leave the doors on for tonight and, if it still looks good in the daylight I'll put the front wings on tomorrow then the doors can come off again ready for assembling them. I'll see if I can get some pics tomorrow but it's not easy in such a confined space.
To break up the wall of text a bit, this is the fabricated alternator mount...
Here are the wings with the outer skins and inner wings attached and ready for fitting...
-
davew
- Chairman
- Posts: 2242
- Joined: Fri Jan 05, 2007 8:54 pm
- Location: Knaresborough
- Full Name: Dave White
I don't seem to have achieved a lot today, basically spent the morning trying to adjust the bulkhead/doors/rear tub. This afternoon I then started to trial fit the wings which turned into a mammoth job.
I've never had so many problems trying to fit the wings to a Defender before, not sure exactly what's up with these ones but I can see at least another day spent trying to get everything lined up.
Anyway, a picture of the current state of progress....
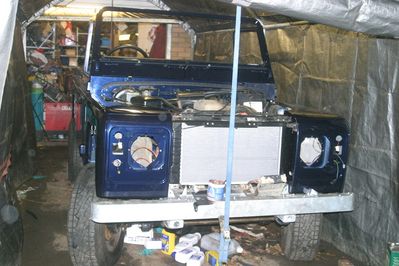
I think I'll have to loosen off and possibly remove the bulkhead bracing brackets and get everything adjusted in without them as I'm convinced they are the source of the problem. If I can get everything lined up without them I'll then have to figure out what packing pieces I need to make them fit.
I've never had so many problems trying to fit the wings to a Defender before, not sure exactly what's up with these ones but I can see at least another day spent trying to get everything lined up.
Anyway, a picture of the current state of progress....
I think I'll have to loosen off and possibly remove the bulkhead bracing brackets and get everything adjusted in without them as I'm convinced they are the source of the problem. If I can get everything lined up without them I'll then have to figure out what packing pieces I need to make them fit.
Dave,
Amazon sell the special alignment tools for lining up the bulkheads and doors.
http://www.amazon.co.uk/dp/B0001IWI2Y/ref=asc_df_B0001IWI2Y559897?smid=A3P5ROKL5A1OLE&tag=googlecouk06-21&linkCode=asn&creative=7974&creativeASIN=B0001IWI2Y
I have used this a couple of times myself to overcome Landrovers tolerances.
Regards
Bo
5/4 of people admit that they’re bad with fractions.
-
davew
- Chairman
- Posts: 2242
- Joined: Fri Jan 05, 2007 8:54 pm
- Location: Knaresborough
- Full Name: Dave White
Having resisted the urge to reach for the large heavy adjustment tool, today was spent trying to figure out why the wings were pulling away from the bulkhead and the doors were about an inch lower then the rear tub.
I made some progress after loosening everything off and moving the bulkhead forward. It took a few hours but by the end of the day the wings were straight and in the correct position and the drivers side door is lined up correctly. Sadly the passenger side door is a very different story and I eventually gave up and called it a night when the rain turned to sleet and the urge to grab the nearest adjustment tool and bray ten bells out of the bodywork started to become a genuine thought.
I've come to the conclusion that the guys who build Defenders on a production line simply don't get paid enough and I will NEVER criticise Defender panel gaps again ! No wonder land Rover always claim they are too labour intensive to build, I've spent three days trying to get the panels lined up and it's still not right.
Having consumed a decent sized pizza and washed it down with a few pints of assorted ales I've come to the conclusion that the windscreen frame will have to come off or at least be loosened. It's using the fixed "hinges" which made me assume that they would not need any adjustment but the more I think about it the more convinced I am that I need to slacken the hinges off and tilt the windscreen forward to match the angle of the door frames. I'll then need to use the roof to fix it's top position before tightening it... maybe...
I'll give that a go tomorrow and see where that leaves me.
-
davew
- Chairman
- Posts: 2242
- Joined: Fri Jan 05, 2007 8:54 pm
- Location: Knaresborough
- Full Name: Dave White
Finally made some progress today. Loosening the windscreen frame to give more room around the front of the passenger door frame allowed me to get the door lined up in the frame a bit better. It's not perfect but then I guess none of them are.
With everything finally lined up I could tighten the bulkhead and wings up. I then took the passenger side door off to modify it to fit the new inner panel.
With all that done I finally got around to bolting more bits on so I cleaned off the passenger sill bar and made up some captive nut plates. With the sill bar in place I could also put the floor plate in at that side.
I'll build up the passenger side door during the evenings this week then when I know where the new brackets can go for the inner door plate I'll strip it back down, make and fix the brackets and rust proof it.
No wonder land Rover always claim they are too labour intensive to build, I've spent three days trying to get the panels lined up and it's still not right.
S'ok, landrover dont get them right either - they give up after 30 seconds.
I was parked next to a brand spanking new puma 110 yesterday and the panel gaps around the drivers door were so wonky it made the panel gaps round my previously rolled and very wonky defender look good! Top right corner touched the roof, bottom left was about 1/2" away from the tub and you could see the seat box through the gap.
Bugger!
Another bloody dent...
Another bloody dent...
-
Zedman

- Posts: 440
- Joined: Mon Feb 08, 2010 9:19 pm
- Location: Knaresborough
- Full Name: Richard Bentley
Dune Buggy
Turn it into a dune buggy, just ditch he bodywork weld in some extra tubing )
BTW saw the work going into it, made me want to strip mine to bare bones and rebuild it )
I very much want coil suspension, if my motor bike can negociate speed bumps and level crossing with hardly a blip it sets the standards possible
Nrly 12" travel at both ends
http://a62.ac-images.myspacecdn.com/ima ... 6994f5.jpg
Give me a few pays days once the wife Skoda is paid off and hopefully will be able to mod it
Jeep wrangler / Defender owner
If its not rattling its more than likely fallen off !
If its not rattling its more than likely fallen off !
-
davew
- Chairman
- Posts: 2242
- Joined: Fri Jan 05, 2007 8:54 pm
- Location: Knaresborough
- Full Name: Dave White
Got a few jobs sorted this week during the evenings although, inevitably, not really the jobs I'd planned on doing. I put the drivers side sill in and fitted the floor, put some of the glass in the side panels and the rear door, part assembled the passenger door to see where the inner plate mounting bracket I need to add can go.
I also managed to get the lights and fittings into the wings and built most of the front end so, apart from the bonnet not being there, it looks pretty much complete from the front. I finally got hold of the special Land Rover "rivnuts" that are used for the seat mounts and fitted those. My new heavy duty rivnut tool wasn't man enough for the job as, although they have an M* thread they are basically M10 steel Rivnuts. Fortunately you can get to the back of them so a long M8 bolt, some washers and a nut did the job.
Today I decided to try and sort the engine oil leak out prior to driving it out of the plastic garage so I can fit the rear half shafts. Having diagnosed the problem as a leaking sump it was to be a simple job of dropping the sump, adding instant gasket, putting it back on again... couldn't be simpler... could it ?
2 hours later sump back on, new oil filter and 6 measured litres of oil back in and it's still pissing oil out of the gap between the sump and the flywheel cover plate...
Decided to take the cover plate off so I could get a better view of the leak. As the last of the bolts came undone and a slight gap appeared between the plate and the bellhousing a torrent of oil started escaping through the gap. I'm not exaggerating when i say around 3 litres of engine oil came out, perhaps I should have taken the wading plug out earlier !
Whilst pondering how on earth the gearbox bellhousing could get so much oil in it I realised a few other odd things may be connected.
1) Before I first fired the engine up I was surprise to find no oil in it, i didn't remember draining the oil when i removed the engine but then that was getting on for 3 years ago now so perhaps I had drained it.
2) When I was draining the oil prior to removing the sump this morning my drain can overflowed. This can holds around 10 litres of oil and I'd emptied it recently so it was a bit of a surprise but then the can has been squashed a few times in the past. I had to put the sump plug back in, empty the drain can and continue.
3) When I put the measured 6 litres of new oil into the engine it didn't register on the dipstick at all.
It took me a while to figure out what the problem was but when I did, all of the above suddenly made perfect sense ! At some point the dipstick tube had been pulled out of the engine by about 6 inches so when I filled it up prior to starting it for the first time I actually ended up without around double the amount of oil in it it should have had !
After straightening the tube out and inserting it properly, the oil level now registers on the dipstick and it seems like the "leak" is sorted. What was left of the afternoon was spent topping up the rest of the oils in the axles and transmission.
-
Zedman
- Posts: 440
- Joined: Mon Feb 08, 2010 9:19 pm
- Location: Knaresborough
- Full Name: Richard Bentley
Careful
The early photos of the initial strip down were starting to look very much like a jeep with the top down )
http://carphotos.cardomain.com/ride_ima ... _large.jpg
http://carphotos.cardomain.com/ride_ima ... _large.jpg
Jeep wrangler / Defender owner
If its not rattling its more than likely fallen off !
If its not rattling its more than likely fallen off !
Who is online
Users browsing this forum: No registered users and 23 guests