Another 90 joins the pack ...............

Another 90 joins the pack ...............
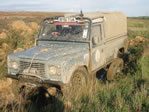
So following a great weekend at RHB co-driving for Phil (Green series II) I found myself leafing through Ebay on Monday afternoon and came across a vintage (1985) 90 hard-top with a 200 TDI conversion and to cut a long story short, by 10:30 that evening it was on my drive and I my wallet was £1,800 lighter 
It's off the road at the moment and it'll be going in my garage this weekend (assuming I can get the new kitchen that's stacked-up in there moved elsewhere) for a thorough strip down and fettle. My aim is to build it back up in a fairly standard way initially, only replacing parts that are knackered, do some events and then look to add some goodies as the need arises (and the wallet allows).
I'd be interested in any opinions of what folks consider as the 'essential' upgrades for competing, mainly in the area of protecting the vehicle and also if anyone happens to have some of said 'essentials' taking up valuable space in their garage and want rid of them
I'll post a couple of photo's this weekend and also as the project goes on.
Re: Another 90 joins the pack ...............
Excellent! Well done 
I look forward to the photos.
From observation of others I would say that all you need to add to a 200tdi powered 90 to be competitive is a set of MT's - they appear to me to be frankly superb right out of the box
Roger
I look forward to the photos.
From observation of others I would say that all you need to add to a 200tdi powered 90 to be competitive is a set of MT's - they appear to me to be frankly superb right out of the box
Roger
Assuming its not galvanised, I would start with the chassis, get it cleaned up, do any repair work it needs and paint and protect it before you introduce it to mud and water. Waxoil the inside of the chassis as mud and water will find its way in and sit there slowly eating it away. Once its been offroad its a pain in the a$se as the mud gets everywhere. Door pillars are another area which need rust protection. A front dif guard is a sensible starting point for physical protection, all the other bits you can replace if you bend them as you go along.
5/4 of people admit that they’re bad with fractions.

Thanks fellas. I'll be taking the body off so will have easy access to the chassis. What's the best way to protect the chassis, given that I'll be able to give it a good wire brushing before applying any sort of protective coating?
Is it also worth treating the underside of the body with the same whilst I've got it off?
Bo - is there any way of inhibiting any existing rust inside the chassis before waxoyling?
Cheers
Is it also worth treating the underside of the body with the same whilst I've got it off?
Bo - is there any way of inhibiting any existing rust inside the chassis before waxoyling?
Cheers
if you;re taking the whole body off - buy a bulk order of flapdisks for your grinder and get to work!
once the outside of the chassis is done. i would be tempted to drill some nice 10mm holes in several strategic places along the bottom of each chassis leg to aid future cleaning and also make some fairly substantial 'washing holes' at the front and rear of each leg. You can always reinforce the holes by welding a large 10mm internal diameter washer around the holes if you think it needs it.
that way you will be able to easily get a good long jetwash lance inside the chassis to blast out all the mud and it'll run out of the larger drain holes easier. The standard sized drain holes are useless, they block up and require lots of poking with a screwdriver to keep free when cleaning....
When i last attacked my chassis to give it a completely thorough cleaning and waxoyl - i managed to fill an ENTIRE wheelbarrow with mud. How much mud went down the drains, no idea. You will be surprised how much accumulates.
Then leave it to thoroughly dry and inject the whole lot with your choice of anti rust stuff. Waxoyl, dinitrol, old engine oil/diesel mix. Then do the same with the outside, but use the stickier black waxoyl or schultz.
Not alot else you can do, unless you really go mad and strip the whole thing back to bare and get it acid bathed and galv'd. but thats not cheap and can be risky on an old chassis.
Bugger!
Another bloody dent...
Another bloody dent...
I always paint the steel bits with a couple of coats of this
http://cgi.ebay.co.uk/TRACTOL-927-Zinc-Rich-Cold-Galvanising-Paint-1-x-2-5ltr-/370256950418?cmd=ViewItem&pt=UK_DIY_Material_Paint_Varnish_MJ&hash=item563508b492Once it has had time to dry, I then paint over it with Chlorinated Rubber paint. You can buy this from Shipley Paints. The combination of these gives a very robust and waterproof finish.
http://cgi.ebay.co.uk/TRACTOL-927-Zinc-Rich-Cold-Galvanising-Paint-1-x-2-5ltr-/370256950418?cmd=ViewItem&pt=UK_DIY_Material_Paint_Varnish_MJ&hash=item563508b492Once it has had time to dry, I then paint over it with Chlorinated Rubber paint. You can buy this from Shipley Paints. The combination of these gives a very robust and waterproof finish.
5/4 of people admit that they’re bad with fractions.
Right - finally got the seats and subframes out - bolts were all rusty as hell - used about half a can of WD40 but managed to get them all out without having to resort to my angle grinder
Roof is also off and now it comes to removing the rear tub. Questions:
1. Apart from the 8 small bolts just behind the seats and the 10 obvious bolts on the rear crossmember, are there any more mechanical fixings holding the tub on?
2. Is there a nice multiway plug hidden under the body somewhere that disconnects the wiring loom from the rear lights
3. Do I have to remove the fuel tank before I attempt to remove the rear tub
Answers and further guidance very much appreciated. I'll post some more pictures this weekend.
Cheers
Mark
Progress ......
Right - managed to remove the roof and rear tub. Had to resort to the trusty angle grinder for some of the nuts/bolts underneath. Here's how she looks now:
You do not have the required permissions to view the files attached to this post.
Is it terminal....?
Having gained access to the chassis, I've been having a good poke around to check the condition. The main problem areas seem to be around the rear shocker mounts and on the top of the chassis near the big chunky crossmember (not sure what it's called).
Some pictures by way of explanation....
So the question is - is it worth taking the shocker mounts off and getting the top and side of the chassis plated in this area? Problem may be that there isn't enough good metal left to get a strong weld on, although the rest of the chassis looks pretty good and it's had a new rear crossmember not too long ago so that's fine.
Going the whole hog and getting a new galvenised chassis will take most of the budget I've got left and there will be some parts I have to replace as I build it back up.
Views..........
You do not have the required permissions to view the files attached to this post.
Fuel tank
Oh, and another thing - when I got the body off, the fuel tank doesn't seem to be held on by much, however there is evidence (long since corroded away) of some kind of bracket/fixing between the rear of the fuel tank and the outrigger tube (see photo below).
Am I right about some kind of fixing that's meant to be here?
Am I right about some kind of fixing that's meant to be here?
You do not have the required permissions to view the files attached to this post.
Who is online
Users browsing this forum: No registered users and 6 guests